
Digital Signatures Explained (With a 5-Minute Hands-On Lab)
Learn how digital signatures protect software and data from tampering. In this beginner-friendly guide, you’ll understand the theory and then build a small Docker lab to sign and verify files yourself

When you download software from the internet, how do you know it hasn’t been modified by an attacker?
What stops someone from replacing the file with malware?
This is exactly the problem digital signatures solve.
In this article, I’ll explain how digital signatures work, and then we’ll build a small Docker lab where you can try it yourself in 5 minutes.
What You’ll Learn
Before we dive in, here’s what you’ll learn in this article:
• What digital signatures are and why they are important
• How digital signatures protect integrity and authenticity
• How the digital signing process works step by step
• How to create and verify a digital signature yourself
• How tampering with a file breaks the signature
By the end of this article, you won’t just understand digital signatures in theory, you’ll see them working in practice and be able to sign any file!
If you find this article helpful, consider liking the post so more people can discover. I appreciate your time! Thank you!
The Theory
Let’s start with the theoretical background. I know it sounds boring, but like it or not, if you want a career in cybersecurity, you need to know why you do things, not just how to do them.
Digital signatures solve two main problems:
Integrity
The file was not modified.Authenticity
The file was created by the expected sender.
If you’re not familiar with those terms, I got you covered: CIA Triad
Let’s look at a simple example.
Imagine someone sends you a file.
It contains payment instructions for transferring a large amount of money.
But an attacker intercepts the file and sends you a modified version with different payment details.
The document looks identical.
You send the money.
It’s gone.
Digital signatures prevent that.
They allow the receiver to verify that:
The file was created by the claimed sender
The file was not modified by anyone else
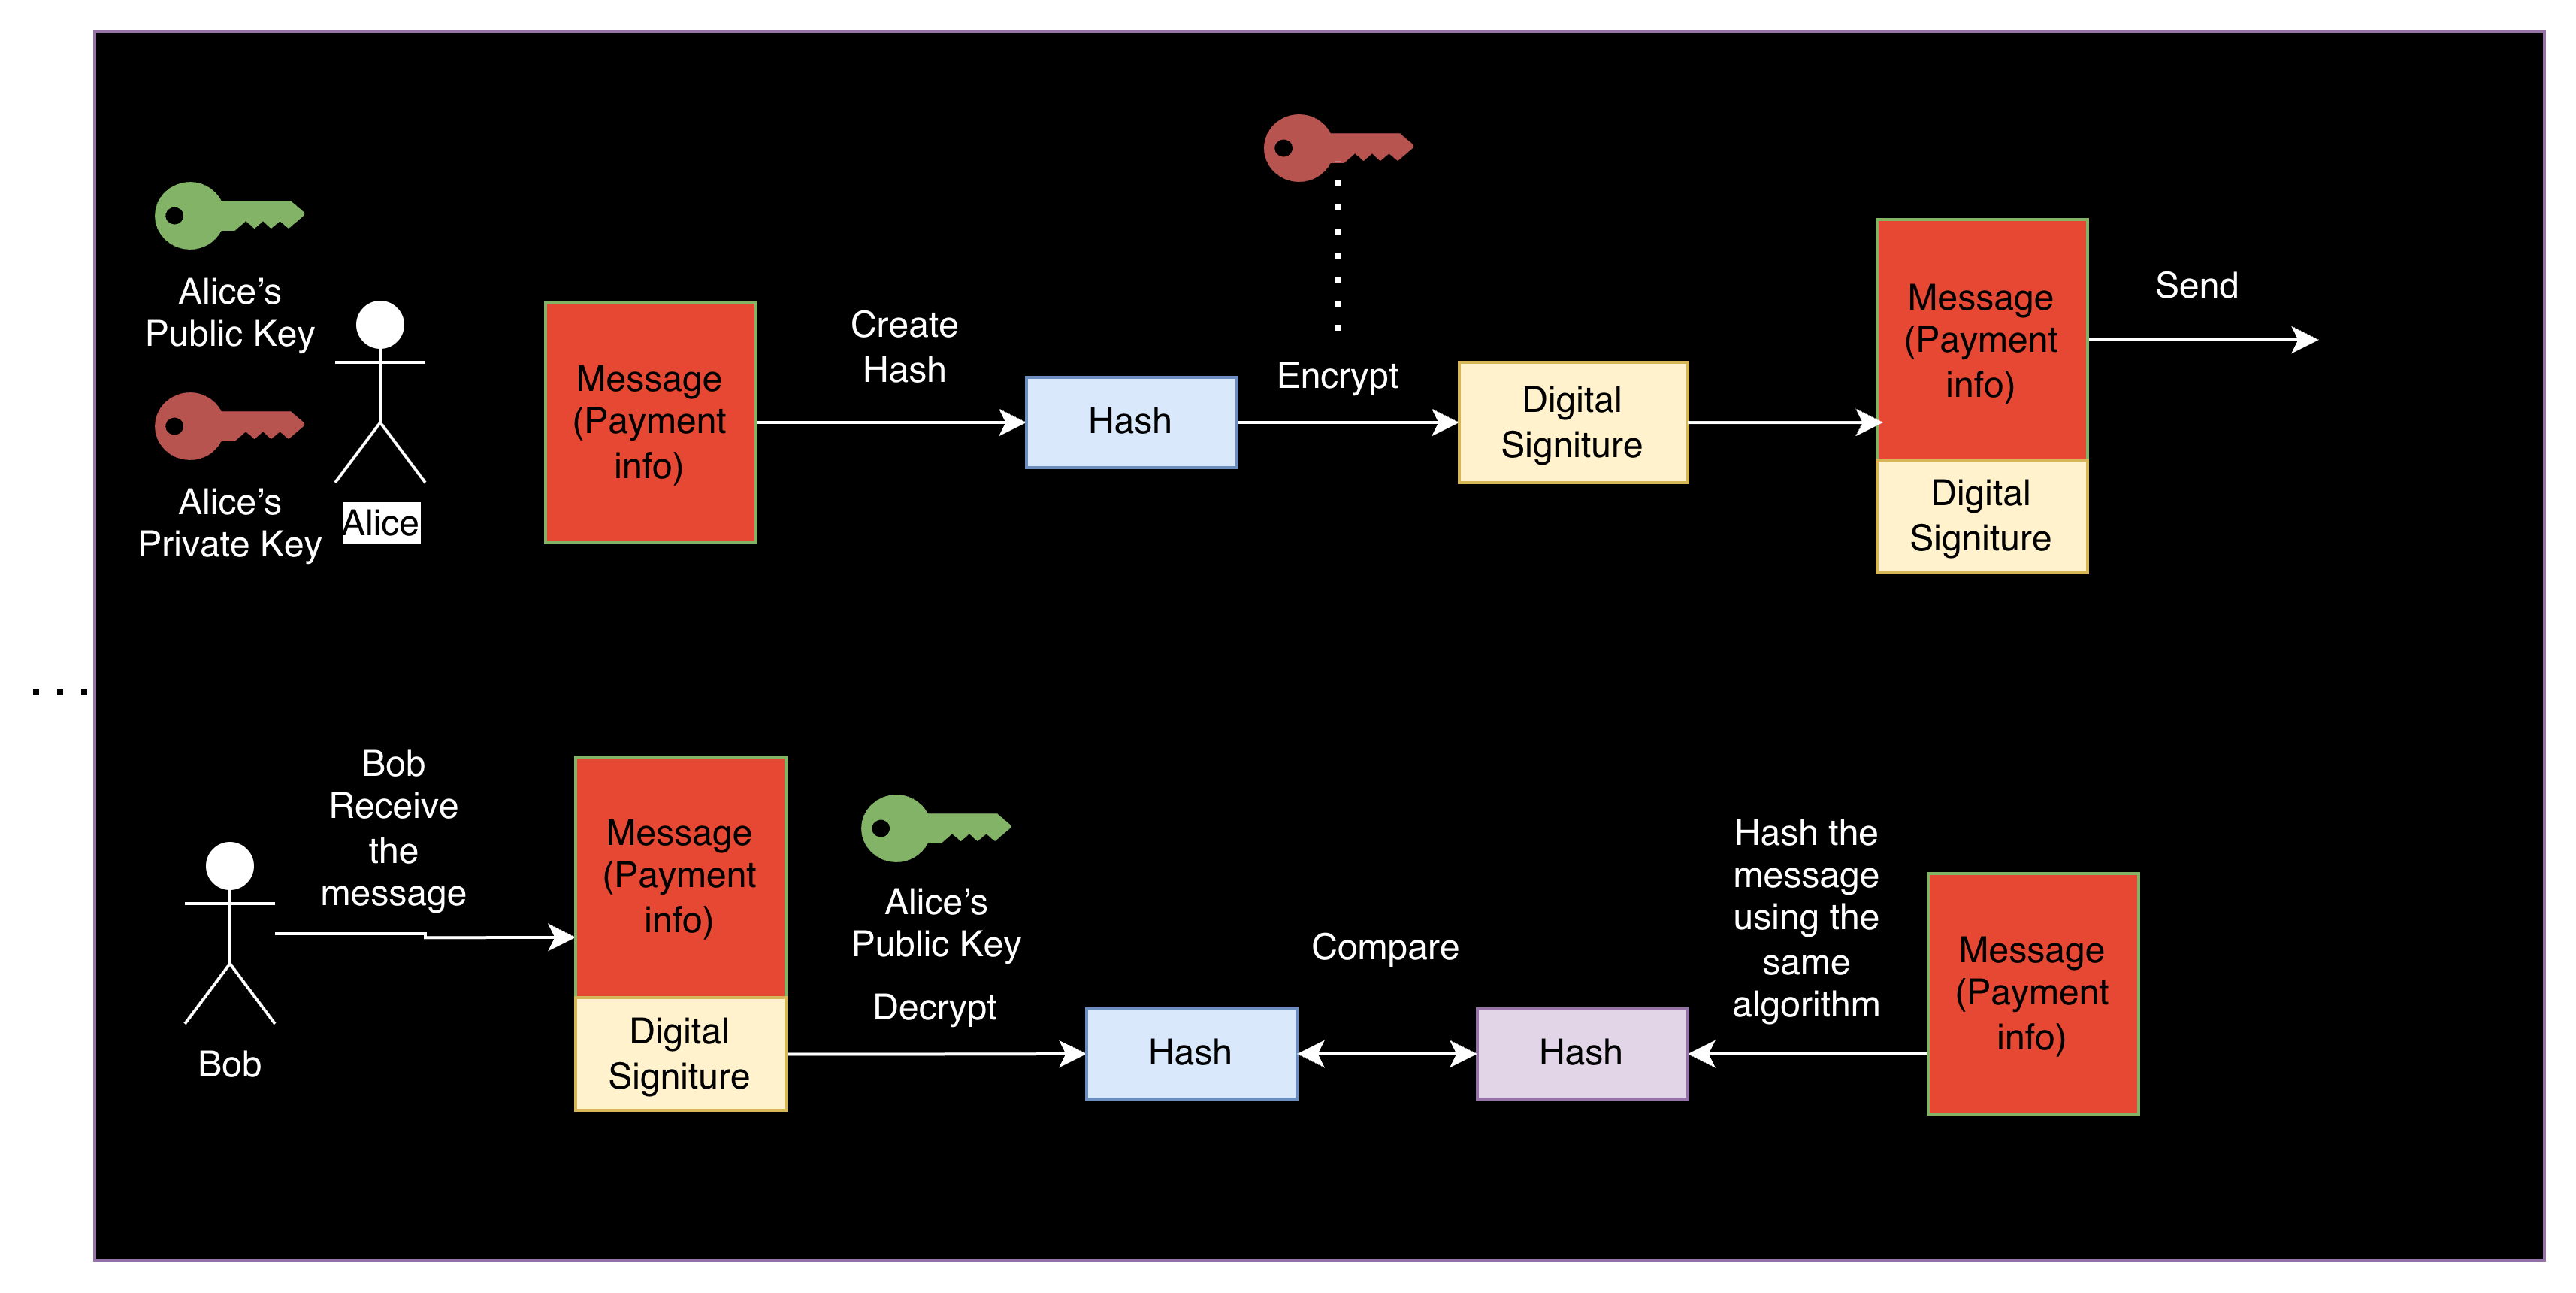
How does the whole process work?
Great, now we know what problem we are solving here.
Now let’s walk through the process step by step.
As always, we have Alice and Bob, and Alice wants to send a message to Bob, while Bob needs to be sure that the message is really from Alice and wasn’t modified by anyone else.
They need to perform the following steps:
1. Alice creates a message
For example, the message contains payment information.
2. The message is hashed
Alice runs the message through a hash function.
A hash function converts the message into a short fixed-length value called a hash.
( more information about hashing here: Hashing: What It Is and Why It’s Not the Same as Encryption)
Even a tiny change in the message would produce a completely different hash. So that ensures that any changes are discoverable.
3. Alice signs the hash
This might be a little tricky. What does it mean to sign the hash?
In this case, it means encrypting the hash using your private key.
If you’re not familiar with asymmetric cryptography and its key, I got you covered: Symmetric vs Asymmetric Encryption: What’s the Difference?
So, in our scenario, Alice encrypts the hash using her private key.
This encrypted hash is called the digital signature.
4. Alice sends the message and the signature
Alice sends the message along with the digital signature to Bob.
5. Bob verifies the signature
Bob performs two checks:
Bob hashes the original message.
Bob decrypts the signature using Alice’s public key to obtain the original hash.
Finally, Bob compares the two hashes.
If they match:
The message was not modified (integrity)
The message was signed by Alice (authenticity)
If the hashes are different, the message was tampered with.
Key takeaways
Before we move to the practical lab, let’s summarize the most important points.
Digital signatures protect both integrity and authenticity.
They combine hashing and asymmetric cryptography.
Only the sender can create a valid signature using the private key.
Anyone can verify the signature using the public key.
If the hashes don’t match, the message was tampered with.
Hands-On Lab: Try Digital Signatures Yourself
Okay, enough theory! You need to convince people that you are really good at cybersecurity, and the only way to do that is to show them something real.
Let’s see how digital signatures work in practice.
In this short lab, we will:
generate a private and public key
create a message
sign the message
verify the signature
modify the message and watch the verification fail
To keep things simple, we’ll run everything inside a Docker container with OpenSSL.
If you don’t know how to use Docker, I have created a simple guide for you for FREE: Docker Guide
Step 1: Create the Lab Environment
Create a new folder for the lab:
digital-signature-labInside the folder, create a file called:
DockerfileAdd the following content:
FROM ubuntu:22.04

RUN apt-get update && \
    apt-get install -y openssl

WORKDIR /lab

CMD ["/bin/bash"]
This container simply installs OpenSSL, which we’ll use to create and verify digital signatures.
Step 2: Build the Docker Image
Build the container:
docker build -t signature-lab .Step 3: Start the Container
Run the container:
docker run -it signature-labYou are now inside the lab environment.
Step 4: Generate a Key Pair
First, we generate a private key.
openssl genrsa -out private.key 2048Now extract the public key from it:
openssl rsa -in private.key -pubout -out public.keyYou should now have two files:
private.key
public.key
Remember:
Private key → used to sign
Public key → used to verify
Step 5: Create a Message
Let’s create a simple message file:
echo “Send €10,000 to account 12345” > message.txtCheck the file:
cat message.txtStep 6: Sign the Message
Now Alice signs the message using her private key.
openssl dgst -sha256 -sign private.key -out signature.bin message.txtThis command:
hashes the message using SHA-256
encrypts the hash using the private key
creates a digital signature
You should now have:
message.txt
signature.bin
Step 7:Verify the Signature
Now Bob verifies the message using Alice’s public key.
openssl dgst -sha256 -verify public.key -signature signature.bin message.txtIf everything is correct, you will see:
Verified OKThis means:
The message was not modified
The signature was created using Alice’s private key
Step 8: Simulate an Attack
Now, let’s simulate an attacker modifying the message.
Change the file:
echo “Send €10,000 to account 99999” > message.txtTry to verify the signature again:
openssl dgst -sha256 -verify public.key -signature signature.bin message.txtThis time, you should see an error message:
Verification Failure (or similar)Why?
Because the message changed → the hash changed → the signature no longer matches.
This is exactly how digital signatures detect tampering.
Were you able to reproduce the lab and verify the signature yourself?
Let me know in the comments. I’d love to hear if everything worked or if you ran into any issues.
What We Just Did
In this small lab, you reproduced the exact process used in real systems:
Create a message
Hash the message
Sign the hash with a private key
Send message + signature
Verify using the public key
This mechanism protects many things you use every day:
software updates
code signing
secure email
TLS certificates
Without digital signatures, trust on the internet would be extremely difficult.
Were you able to verify the digital signature?
Let me know in the comments!
Conclusion
Digital signatures are one of the most important building blocks of modern cybersecurity.
They allow us to verify that the data was not modified and that it really came from the expected sender.
This simple idea, hash the data, sign the hash, verify the signature, is what protects many systems we use every day.
Software updates, secure emails, TLS certificates, and signed applications all rely on this mechanism.
Without digital signatures, trusting software and data on the internet would be extremely difficult.
Now that you understand how they work, you’ve taken another step toward thinking like a cybersecurity professional.
See you next time!
Erich
Decoded Security
Let’s connect
If you want to collaborate, discuss, or just geek out over virtualization and cloud security, reach out to me:
Email: erich.winkler@decodedsecurity.com
LinkedIn: Erich Winkler
Gumroad community: Decoded Security
Enjoyed this article? Like it or drop a comment. I’d love to hear your thoughts and questions!
Let’s learn and grow together!