


Another guest post is here, and it is a good one!
It comes from Drawn To Cyber, a newsletter that breaks down complex cybersecurity concepts through simple writing and clear visuals.
In this piece, she follows a single IP address through an entire vulnerability scan and shows exactly how it becomes a finding on your dashboard. If scan results have ever felt like a black box, this will fix that.
Go give her a follow, and enjoy!
You enter an IP address into a vulnerability scanner.
You configure the scan, click Launch, and wait.
A little later, the results start appearing.
Critical. High. Medium. Low.
But how did the scanner get from an IP address to a list of vulnerability findings?
It didn’t simply look at the IP address and somehow know what was vulnerable.
Before producing those findings, the scanner had to discover the host, identify what it could reach, understand what was running, perform relevant security checks, and gather enough evidence to report what it found.
That journey is also where networking and vulnerability management start to connect.
So let’s follow one IP address through a typical network vulnerability scan and see what actually happens along the way.
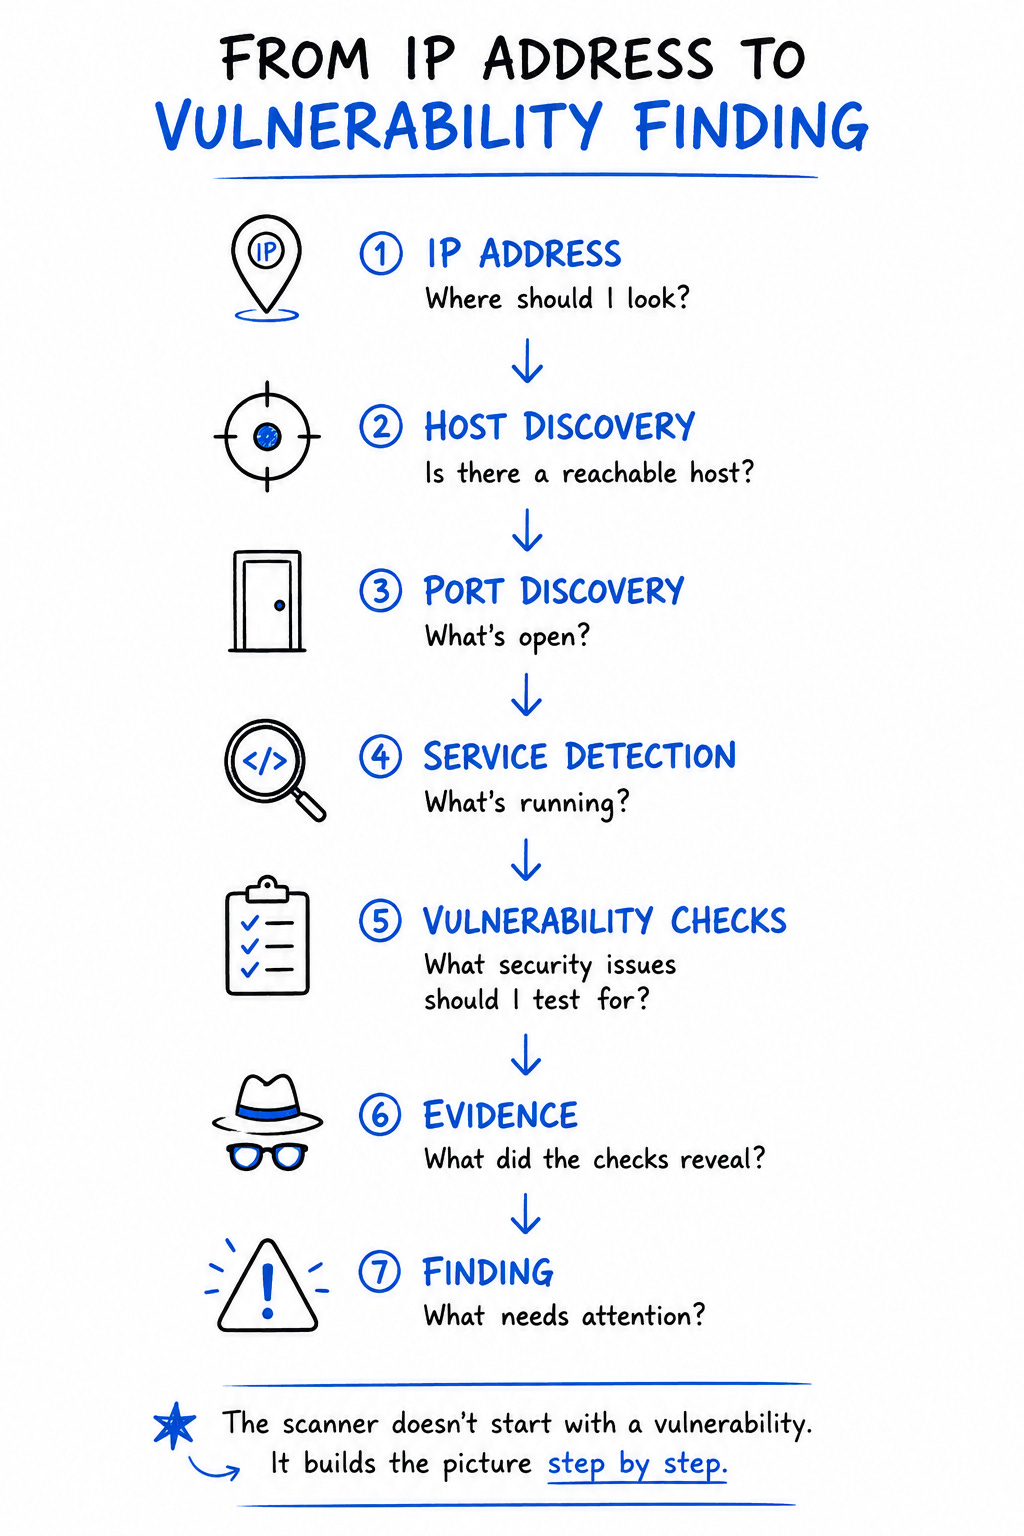
Step 1: It starts with a target
Imagine we want to scan:
192.168.1.25
At this point, the scanner doesn’t know much about the system behind that address.
The IP address simply tells the scanner where to look.
Behind it could be a Windows server, a Linux server, a network device, or something else entirely. What the scanner eventually learns depends on what it can reach, how the scan is configured, and how much access it has to the target.
So before looking for vulnerabilities, the scanner needs to answer a much simpler question:
Is there actually a reachable host at this address?
💬 First time really thinking about what sits behind an IP address? Drop a comment, she reads them.
Step 2: Is the host reachable?
Before spending time checking the target for vulnerabilities, the scanner may first try to determine whether a host is actually reachable at that IP address.
This is host discovery.
The scanner can send different types of network probes and watch for a response. If the target responds as expected, the scanner has an indication that there is a live host worth assessing.
But there is an important catch:
No response doesn’t always mean no host.
A system may be running perfectly well while a firewall or another network control blocks the scanner’s discovery traffic. The scan configuration can also affect how the scanner decides whether a host is reachable.
This is our first example of why networking matters to vulnerability scanning.
What the scanner can discover depends partly on what the network allows it to see.
Once the scanner has a reachable target, the next question becomes:
What is exposed on that host?
👍 Like this if "no response doesn't always mean no host" just changed how you'd read a scan.
Step 3: Which ports are open?
Now that the scanner knows there is a reachable host, it can start looking at the network services exposed by that system.
One way it does this is by checking ports.
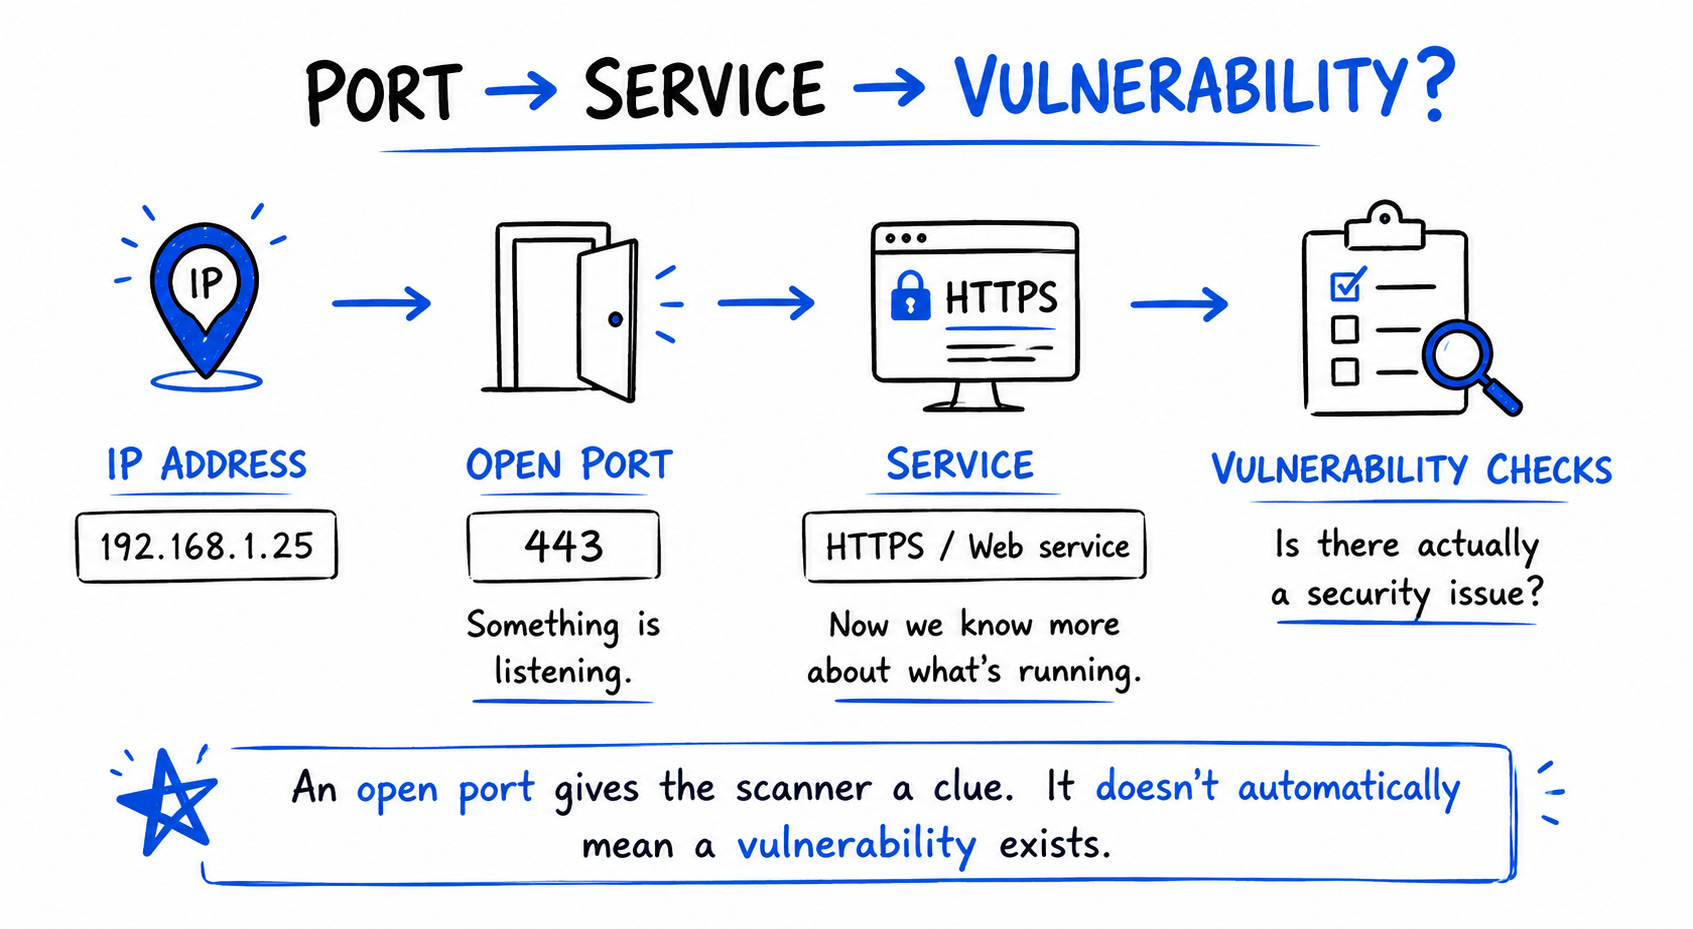
Ports are numbered communication endpoints used by network services. A scan might discover something like:
22 → open
80 → open
443 → open
These numbers provide useful clues. Port 22 is commonly associated with SSH, port 80 with HTTP, and port 443 with HTTPS.
But “commonly associated with” is important here.
Finding port 443 open doesn’t automatically prove that a particular web server is running behind it. Services can run on non-standard ports, and an open port by itself doesn’t tell us everything about the application listening there.
And most importantly:
An open port is not a vulnerability.
At this stage, the scanner has learned that something is listening. It still needs to figure out what that something actually is.
That takes us to service discovery.
Step 4: What service is actually running?
An open port gives the scanner a clue. Now it needs to learn more about what is actually responding on that port.
This is where service detection comes in.
The scanner can interact with the service and examine the information it returns. Instead of knowing only:
443 → open
it may learn something closer to:
443 → HTTPS → web server
Depending on what the service reveals, the scanner may also gather information about the software, version, operating system, or configuration.
This moves the scan from:
“Something is listening here.”
to:
“Here is what I can learn about what’s running here.”
That distinction matters because a port number alone isn’t enough to identify a vulnerability. The scanner needs more information before it can decide which security checks are relevant.
And that’s where vulnerability testing begins.
👍 Hit like if the difference between an open port and a running service finally clicked.
Step 5: Now the vulnerability checks begin
By this point, the scanner has gathered information about the host and the services it can see.
Now it can start running vulnerability checks that are relevant to what it discovered.
Vulnerability scanners contain large collections of checks, often called plugins, signatures, or vulnerability tests depending on the product. Each check is designed to look for a particular vulnerability, configuration issue, or security condition.
How a check works can vary.
A scanner might examine information returned by a service, look for a particular configuration or behavior, check software and patch information, or use other evidence available from the target.
This is why vulnerability scanning isn’t simply:
Detect a software version → match it to a CVE → report a vulnerability.
Version information can be useful, but it is only one way a scanner can gather evidence.
And the amount of evidence available depends heavily on how much the scanner can see.
From the network, its visibility may be limited.
Give the scanner authorized access to the system, however, and that picture can change significantly.
💬 Thought scanning was just "match a version to a CVE"? So did I. Comment if this part surprised you.
Step 6: What changes when the scanner has credentials?
Think about trying to inspect a house while standing outside.
You can see the doors, windows, and anything else exposed to you. You can learn quite a bit, but your view is still limited.
An unauthenticated scan works in a similar way. The scanner examines what the target exposes over the network and runs checks based on what it can observe remotely.
Now imagine being given authorized access to go inside.
With valid credentials and sufficient privileges, an authenticated scan can log in to the target and gather information directly from the system.
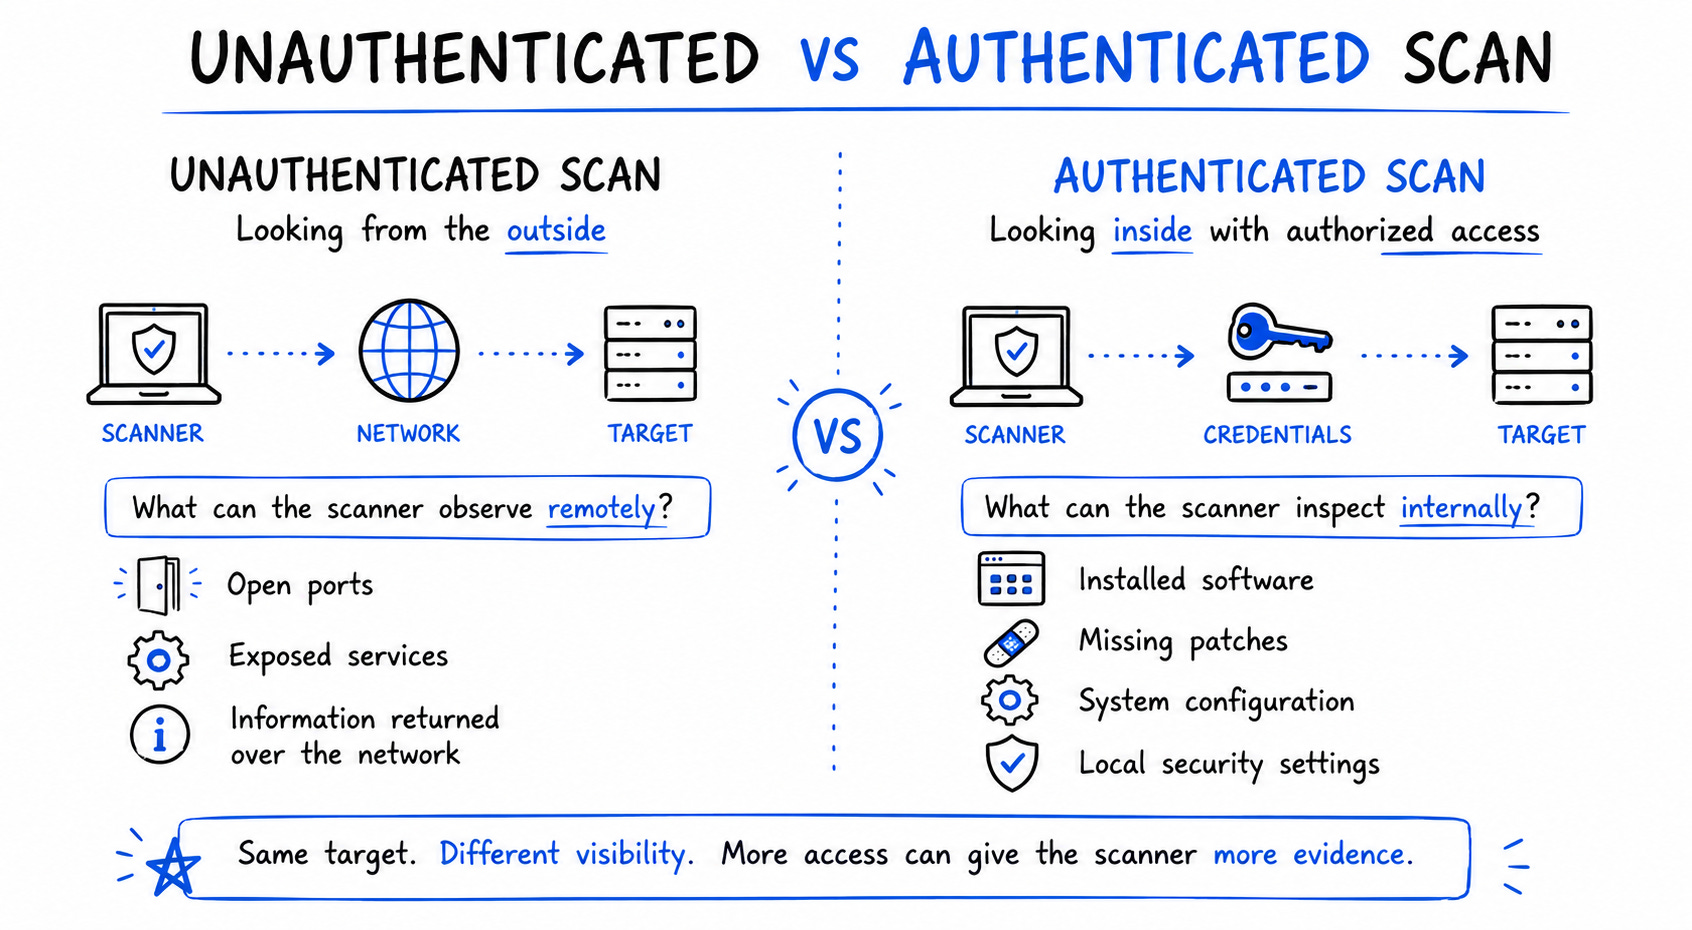
Depending on the operating system and scan configuration, that might include:
installed software
missing patches
system configuration
local security settings
other information that may not be visible remotely
This gives the scanner another source of evidence and can help it identify issues that are difficult or impossible to determine reliably from the network alone.
Same IP address. Same host.
But with greater visibility, the scanner can build a much more complete picture of what is happening on that system.
And with all that evidence collected, we’re finally ready to see what appears in the scan results.
👍 Authenticated vs unauthenticated scanning is a classic interview question. Like this, so you can find it later.
Step 7: We finally reach the vulnerability finding
Now we arrive at what the analyst eventually sees in the vulnerability management platform:
The finding.
By this point, the scanner has gathered information about the target, discovered what it can access, identified services, run relevant vulnerability checks, and collected evidence.
A finding may include information such as:
the affected asset
the vulnerability that was detected
the affected port or service
severity information
evidence from the scan
identifiers such as a CVE, when applicable
recommended remediation
So what initially looked like:
IP address → Vulnerability finding
was actually a journey:
IP address → Host discovery → Port discovery → Service detection → Vulnerability checks → Evidence → Finding
This is the part of vulnerability scanning we don’t always see when looking at a dashboard full of results.
The scanner didn’t start with a vulnerability.
It started with a target and gradually gathered enough information to tell us what might need attention.
But reaching a finding doesn’t mean the work is finished.
For a vulnerability management team, this is often where the next part of the work begins.
The scanner finding isn’t the finish line
Getting a finding into the dashboard doesn’t mean the vulnerability management work is complete.
In many ways, it is just the starting point.
The finding still needs context.
A vulnerability management team may need to understand:
Is the finding accurate?
How important is the affected asset?
Is the system externally exposed?
Is the vulnerability exploitable in this environment?
Are there existing controls that reduce the risk?
Who owns the affected system?
How quickly should it be remediated?
Then comes the work of coordinating remediation, tracking progress, and eventually verifying that the issue has actually been addressed.
This is an important distinction:
Vulnerability scanning finds potential security issues. Vulnerability management is what an organization does with that information.
The scanner gives us the finding.
The real work is deciding what it means in the context of the environment and what needs to happen next.
👍 Like this if "scanning finds it, management decides what to do about it" is the line you needed today.
Why networking knowledge matters in vulnerability management
You don’t need to be a network engineer to work in vulnerability management.
But understanding networking fundamentals makes vulnerability scan results much easier to interpret.
When you understand IP addresses, ports, protocols, firewalls, routing, DNS, and network segmentation, you start asking better questions.
Why couldn’t the scanner reach this asset?
Why is this port exposed?
Why was a service detected on an unexpected port?
Why can the scanner see one system but not another?
Why did an authenticated scan reveal findings that weren’t visible remotely?
And when something looks unusual in the scan results, networking knowledge gives you a better starting point for figuring out why.
You begin to see the scan as more than a list of vulnerabilities.
You can understand how the scanner reached the asset, what it was able to see, and how that visibility influenced the findings it produced.
That’s why networking and vulnerability management are so closely connected.
From an IP address to a finding
The next time you see a vulnerability finding in a scan report, think about what happened before it reached the dashboard.
The scanner had to find the asset, communicate with it, understand what was exposed, gather information, run relevant checks, and collect enough evidence to report what it found.
That journey helps explain something important about vulnerability scanning:
A scanner can only work with the visibility and access it has.
Understanding what happens behind the scan results makes it easier to interpret those results, troubleshoot what looks wrong, and ask better questions as a vulnerability management analyst.
An IP address may be where the scan starts.
But understanding everything that happens after that is what makes the findings useful.
💬 This was a Decoded Security x Drawn To Cyber collab. If you want to see us team up again, like this post and comment below. If enough of you want it, we will make it happen.
Let’s Connect
If you want to collaborate, discuss, or just geek out over networking and cybersecurity, reach out:
Email: erich.winkler@decodedsecurity.com
LinkedIn: Erich Winkler
Gumroad community: Decoded Security
Start Here: Decoded Security Roadmap
Enjoyed this article? Like it or drop a comment. I’d love to hear your thoughts and questions!
Let’s learn and grow together!
Nice one! I really enjoy the visuals and that is something I think will be more and more important in teaching and learning. Would love to see an article on how you think and go about creating these to teach effectively.